
I said I had seen some recipes claiming you can make croissants in just four hours. I scoffed, dismissively. Everyone knows the best croissants take three days to make.
She said nothing. She said nothing very loudly.
You have a way to make croissants in just four hours? I asked.
She said she did. And since she is Helen Fletcher, the pastry chef at Tony's in St. Louis, I took her seriously.
It turns out she knows how to make croissants in just four hours. Actually, what she knows is how to make laminated dough in four hours, and that is the most time-consuming part of croissants.
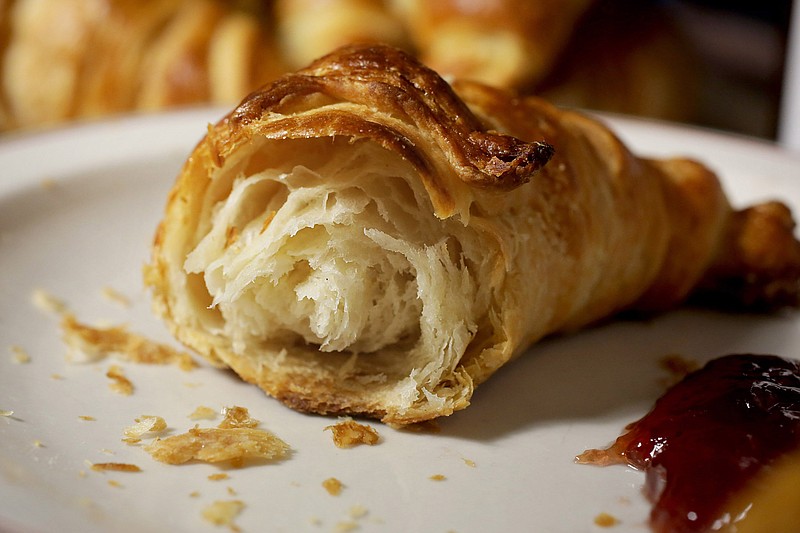
Laminated doughs are doughs for puff pastries and croissants that bake up into dozens of delicate, crisp, buttery layers. They almost shatter into a cloud of pastry dust in your mouth when you bite into them.
The traditional way to make them is to roll out a sheet of dough and cover it with a cool-but-pliable sheet of butter. You then fold those sheets into thirds, like a letter, chill it so the butter does not melt, roll it and fold it into thirds again, chill it again, fold it into thirds, chill and, if you have the time and patience, fold and chill one more time.
A faster and easier way, with results that are nearly as good, involves shredding frozen butter over the initial sheet of dough before folding and optionally chilling several times (you don't have to refrigerate it if you can work fast enough). This method produces what the cheerful folks on "The Great British Baking Show" call "rough puff pastry," or just "rough puff."
Fletcher's method is rougher than rough - that is, it is further from the original concept of laminated doughs. But it is faster and easier and, it turns out, every bit as good.
Fletcher's method, which she details in her blog Pastries Like a Pro, does not include a thin layer of butter between each thin layer of dough. In regular laminated doughs, the butter steams as it cooks, and the pressure of the steam forces each layer a little bit apart, resulting in beautifully puffed pastry.
Instead, she incorporates the butter into the dough, as you would a flaky pie crust. Because the dough is repeatedly folded over on itself, as with traditional laminated doughs, you still end up with all of the exquisite layers you would find in other croissants and puff pastries.
She uses a food processor to save time, and saves more by freezing the dough and the pieces of butter before mixing them in the processor. This step makes the dough - with the butter in it - cold enough that you don't have to refrigerate it for an hour after every time you fold it.
Generally, you can make all of your folds before the dough warms up to the point that you have to refrigerate it (the idea is to keep the butter from softening; if it is soft, it won't turn to steam when it is heated). In the summer, or if your kitchen is hot, you may have to refrigerate it before you can finish all of your folds. But if the dough feels cool to the touch, you're good to go.
The longest part of making traditional croissants is spent simply waiting for the dough to gradually develop a robust flavor and a slight tang to counteract the richness. Fletcher cleverly saves two full days by adding robust and tangy buttermilk to the dough.
This method uses quite a lot of yeast - one whole tablespoon, which is more than a packet - to get the croissants to rise quickly, and it calls for instant yeast (rapid-rise) for additional speed. To make them rise faster, she proofs them in an oven that is turned off but has a pan of hot water, which warms the oven just enough for proofing.
And to keep the delicate croissants from burning on the bottom as they cook, she uses what she calls the "double-pan" method. She places the baking sheet on top of another baking sheet and cooks the croissants in the top third of the oven. Two baking sheets take longer to get hot than one, which gives the croissants time to cook to a golden brown all over without scorching the bottoms.
The result is croissants that are simply spectacular, much better than you can get at a grocery store and probably some bakeries. They're light, they're crisp, they're delicate and they're the perfect blend of thin pastry and butter.
And they don't take three days to make. You can make them in just four hours.
OK, maybe five.
THE RECIPE
CROISSANTS
Yield: 16 servings
1 cup plus 2 tablespoons water, about 75 degrees Fahrenheit
2 tablespoons vegetable oil
3 cups bread flour (420 grams or scant 15 ounces)
1/4 cup powdered buttermilk, see note
1 tablespoon instant yeast
2 tablespoons granulated sugar
1 1/2 teaspoons salt
1/2 pound (2 sticks) unsalted butter
1 egg, well beaten
Note: If you can't find powdered buttermilk, substitute whole buttermilk. Use 7/8 cup buttermilk and 1/4 cup water in place of the water and dry buttermilk powder. Everything else remains the same.
1. Combine the water and oil. Set aside.
2. With the steel blade in place, add the flour, powdered buttermilk, instant yeast, sugar and salt to the bowl of a food processor. Process about 5 seconds to mix everything. With the machine running, pour the liquid down the feed tube; process until a ball forms. Continue processing for 30 seconds more to knead the dough. The dough should ride the blade and clean the bowl but remain soft.
3. Remove from the bowl. If it is slightly sticky (and it may be), knead by hand 5 or 6 times, then flatten into a disc 1/2 inch thick. Wrap in plastic wrap and chill in the freezer for 60-90 minutes, or until the edges are very firm about 1/2 inch in all the way around. If using a marble rolling pin, put that in the freezer also.
4. Meanwhile, cut each stick of butter in half lengthwise and then cut each of those pieces in half lengthwise. Then cut each of these lengths into eight pieces. Place butter in freezer to keep hard.
5. Remove the dough from the freezer. Divide the disc into fourths and each fourth into three pieces. With the steel blade in the bowl, place three pieces of dough in the processor with 1/4 of the butter. Process until the largest pieces of butter and dough are about the size of a pea. Turn out onto work surface. Repeat in quick succession three more times.
6. On a lightly floured surface, shape the mixture into a rectangle about 6 inches by 4 inches. Lightly flour the top of the dough and roll it into a rectangle about 18 inches by 6 inches, keeping the ends as square as possible and the sides as straight as possible. Use your hands to even it out and keep the butter from scooting out. Wipe the rolling pin frequently with paper towels and scrape the work surface with a pastry scraper or a knife to prevent the dough from sticking.
7. Brush the excess flour from the dough with a pastry or basting brush so the pastry will properly adhere. Fold into fourths by bringing the top and bottom ends of the dough to the center. Brush the excess flour off again, then fold in half. Turn the dough so the folded edge is to the left. This process of rolling, folding and turning the dough is called a "turn."
8. Repeat rolling, folding and turning in this manner again and then once more for a total of three turns. Because the butter is frozen and the dough well chilled, it should be possible to complete all three turns without chilling the dough between turns. However, if necessary, place the dough on a baking sheet and put it in the freezer for 15-20 minutes, then proceed. With each turn the dough will become smoother but still with butter visible. If desired, the dough may be refrigerated between turns.
9. After the third turn, place the dough in a plastic bag and put in the freezer for about 30 minutes before shaping. If the dough is not to be used immediately, remove from the freezer after 30 minutes and refrigerate up to 3 days before using. Or the dough may be frozen after completion for 3-4 months. In this case, defrost 24 hours in the refrigerator before using.
10. Fill a 9-by-13-inch pan half way with the hottest tap water available. Place on the bottom of the oven or the lowest shelf possible. Place an oven rack in the upper third of the oven. Close the door.
11. Line two baking sheets with parchment paper. Divide the dough in half. Return half the dough to the refrigerator. On a lightly floured surface, dent the dough with a rolling pin several times to make it easier to roll. Roll the dough into an 8-by-24-inch rectangle. If it is difficult to get it to 24 inches, roll to at least 18 inches.
12. Cut into four equal pieces. Cut each of these rectangles in half on the diagonal. Each piece will have one square and two pointed corners. Pull the square corner gently to the side to even up the triangle somewhat. Roll it up lengthwise, stretching the dough gently to lengthen it more once the initial roll is started. Place on the prepared baking sheet and tuck the "tail" corner well underneath. Bend the ends down and in toward the center to form the crescent shape. Cover the rolls with a towel and repeat the process with the other half of the dough. Place the trays in the oven and let proof until doubled in size, about 1 hour.
13. Remove the trays from the oven and remove the water. Preheat the oven to 350 degrees. While the oven is preheating, brush the croissant with the beaten egg. Nestle each pan into another pan of the same size and bake in the upper third of the oven for about 25 minutes, until golden brown and firm to the touch.
14. To make ahead: Freeze after baked and completely cooled. To serve, place directly from the freezer onto baking sheets and heat in a preheated 350-degree oven for about 10 minutes.
Per serving: 230 calories; 14 g fat; 9 g saturated fat; 44 mg cholesterol; 4 g protein; 21 g carbohydrate; 2 g sugar; 1 g fiber; 239 mg sodium; 25 mg calcium
Recipe by Helen S. Fletcher, pastrieslikeapro.com