
This was not my first time turning juice into hooch.
Several years ago, I tried a kit called "Spike Your Juice" that included champagne yeast and an airlock. The process was quite simple - add the yeast to any jug of commercial fruit juice with a high sugar content, pop on the airlock and wait 48 hours - and voila! Low-alcohol booze. The longer you let the yeast do its thing, the higher the alcohol content.
It was a fun but forgettable lesson in fermentation.
This time around, using "The Big Book of Cidermaking: Expert Techniques for Fermenting and Flavoring Your Favorite Hard Cider" by Christopher Shockey and Kirsten K. Shockey as my guide, I decided to forgo the yeast and try my hand at wild cider.
Mostly I was curious but also I'm cheap. I just didn't want to spend money on equipment and supplies for something I might only make once.
So with the Shockeys figuratively holding my hand, I set out to make my own wild yeast cider.
Even if you're only cider-curious, "The Big Book of Cidermaking" is full of useful and interesting information. But for those interested in home brewing cider, I'd call it a must-have. It addressed every question I had throughout the process. Even if you're already an experienced cidermaker, this book might offer some new ideas or recipes.
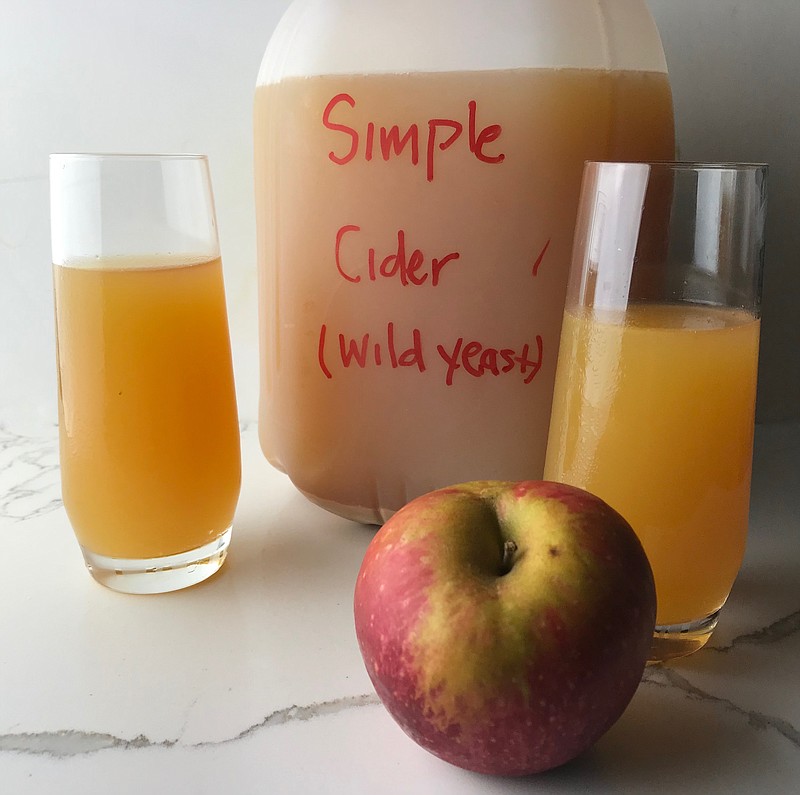
After reading through the various techniques and necessary equipment, I settled on two recipes - Simple Sparkling Cider and Ciderkin. The Simple Sparkling Cider is exactly what it sounds like - a low alcohol, slightly effervescent cider. Ciderkin is made using the pomace (pressed fruit pulp) that remains after making a batch of cider and can be alcoholic or not. I liked the idea of making two beverages for the price of one. (Remember, I'm cheap.)
Both of these recipes appealed to me because they didn't require equipment I didn't already own and were remarkably straightforward in technique.
And even though only one of them resulted in a beverage I want to drink, the experience gave me confidence and piqued my interest enough to maybe try another, more complicated, cider in the future and invest in some additional equipment for my cider house, aka my kitchen.
Speaking of equipment, these are the items I used to make the following recipes: two food-grade 5-gallon buckets with lids, a couple of gallon and half-gallon plastic water/milk jugs, a box grater, a funnel, several large mixing bowls, a casserole dish, butter muslin (cheesecloth), colander, food mill, long-handled spoon, small saucepan, quart-size measuring cup with a spout and ladle.
This recipe produced a pleasant, slightly effervescent cider. I used Jonathan apples from a local orchard, but according to the Shockeys, any apple variety can be used to make cider so feel free to experiment. A more economical approach is to skip the grating and the pressing and use purchased apple juice/cider that is free of preservatives and has not been ultra-pasteurized.
SIMPLE SPARKLING CIDER
18 to 20 pounds apples (I used Jonathans) OR 1 gallon unpasteurized or flash pasteurized/HTST apple cider/juice free of preservatives/emulsifiers
Wash a 1-gallon plastic jug or several plastic water bottles equivalent to 1 gallon in hot, soapy water and rinse thoroughly. Dry.
If you have an apple press, by all means, use it. If you don't have an apple press, using the large holes on a box grater, grate the apples to, but not through the core, rotating the apple as you go. Place the grated apples in a large mixing bowl or bucket.
Set a large colander over a separate bucket or very large mixing bowl and line the colander with butter muslin or cheesecloth. Working with a cup or two at a time, ladle the grated apples (and any accumulated juice) into the colander and draw up the corners of the cloth and squeeze out the juice. (Save the squeezed pulp to make ciderkin, if desired, or discard.)
Transfer the juice to the cleaned and dried plastic jug or water bottles, filling the jug/bottles to about 2 inches from the top. Screw on lids and leave in a cool place (below 68 degrees) for a week or longer. I left mine on the counter for a few days when my kitchen was cool, then moved them to the refrigerator where they continued to ferment. As the naturally occurring yeast consume the natural sugars in the juice they will create carbon dioxide causing the containers to swell - be sure to "burp" the containers as needed by quickly unscrewing or removing the lid and replacing it as soon as the gas escapes. They may need burping a couple of times a day or once every couple of days. Just keep an eye on them.
Let it ferment for at least a week (for sweeter, very low-alcohol cider) or up to a month (for dry, slightly higher, but still low-alcohol cider). Refrigerate and enjoy, but be sure to burp the container occasionally as it will continue to ferment.
Makes about 1 gallon.
Of the two recipes, this is the one that didn't quite do it for me. But that's not to say you shouldn't try it. The finished cider was drinkable, it just wasn't the flavor I'd hoped for. The molasses flavor overpowered the apple flavor and, honestly, this one tasted a little too funky for me.
I scaled the recipe by half for the amount of pomace I had after making Simple Sparkling Cider. Assuming you'll do the same I'm using my proportions here.
CIDERKIN
1 3/4 gallons pomace (pressed apple pulp)
1 1/2 gallons boiling water
1/2 cup unsulphured molasses
Combine the pomace and boiling water in a sanitized 5-gallon bucket; cover and let stand overnight (8 to 12 hours).
The next morning, set a large colander over a separate bucket or very large mixing bowl and line the colander with butter muslin or cheesecloth. Working with a cup or two at a time, ladle the steeped pomace and liquid into the colander and draw up the corners of the cloth and squeeze out the liquid. This liquid is ciderkin - it can be enjoyed as is or fermented. To enjoy now, transfer the ciderkin to clean plastic bottles or a jug and refrigerate. Unfermented it will keep in the refrigerator for a week to 10 days.
To ferment:
Wash a 1-gallon plastic jug and a half-gallon plastic jug or several plastic water bottles equivalent to 1 1/2 gallons in hot, soapy water and rinse thoroughly. Dry.
In a small saucepan, warm 1 cup of the ciderkin over medium heat until hot, but not boiling, about 160 degrees. Remove from heat and stir in the molasses.
Add the molasses mixture to the ciderkin in the bucket and stir well to incorporate.
Transfer the mixture to the cleaned and dried plastic jugs or water bottles, filling the jug/bottles to about 2 inches from the top. Screw on lids and leave in a cool place (below 68 degrees) for a week or longer. I left mine on the counter for a few days when my kitchen was cool, then moved them to the refrigerator where they continued to ferment. As the naturally occurring yeast consume the natural sugars in the juice they will create carbon dioxide causing the containers to swell - be sure to "burp" the containers as needed by quickly unscrewing or removing the lid and replacing it as soon as the gas escapes. They may need burping a couple of times a day or once every couple of days. Just keep an eye on them.
Let it ferment for at a week (for sweeter, very low-alcohol) or a little longer (if you want it drier). Refrigerate and enjoy, but be sure to burp the container occasionally as it will continue to ferment.
Makes about 1 1/2 gallons.