
And just like that, we became a nation of bakers.
One day we were saying "Do you think this coronavirus thing is going to be bad?" and the next we were all at home in our flour-covered aprons baking loaves upon loaves of bread and wondering why we couldn't find yeast at the stores.
The bread-baking continues unabated, and so, to some extent, does the yeast shortage. Flour, fortunately, is more widely available, though not necessarily the kind you want. Whole wheat and bread flours are still hard to find.
Now that so many Americans have rediscovered the simple, calming joys of baking bread, I decided to make a handful of my favorite varieties. They are the loaves that have sustained me - in more ways than one - through the pandemic.
I have one caveat: Bread-making is a time-consuming process. Most of the time is not hands-on, so you can be doing other things elsewhere in your house or apartment, but you have to return to the kitchen every so often to perform the next step.
The one exception to the slow-and-steady bread-baking rule is one-hour bread, which, as the name implies, takes one hour to make from start to finish. It is a perfectly acceptable loaf, especially toasted, but with more available time in the kitchen I prefer to make breads that are heartier, more complex and, frankly, better.
The kind I make most frequently is Jim Lahey's revolutionary no-knead bread. It is very nearly as good as any loaf you can get at a bakery and is especially easy to make. And because the dough develops its flavor overnight, you can literally sleep through most of the process.
Lahey, who owns the famous Sullivan Street Bakery in New York, discovered (or rediscovered) the secret to making full-flavored bread: time. The longer it takes bread to rise, the more it develops a robust taste. Lahey only uses 1/4 teaspoon of yeast, which means the dough takes at least 12 hours to fully rise.
The recipe is exceptional on its own, but I like to play around with it a little. I often use equal amounts of all-purpose flour and a fancy-pants high-protein flour that is brutally expensive ($10 for 3 pounds) but actually kind of worth it. It gives the loaf an appealingly nutty flavor and a slightly coarser texture.
I also use the same basic recipe to make Lahey's version of whole-wheat bread. It uses 21/4 cups of all-purpose flour and 3/4 cup of whole wheat (but you can change the proportions, as long as the amount adds up to 3 cups of flour), and requires 1/2 teaspoon of yeast. I don't even like whole wheat bread very much, but this one is absolutely amazing. It has whatever it is that other whole wheat loaves lack.
For my next loaves, I made chocolate bread. You heard me: chocolate bread.
It's not what you probably imagine it to be, but it is amazing nonetheless.
It is not cake or even remotely cakelike; it is bread with chocolate in it, and it is barely sweet at all. It is a loaf of elegance - actually, three loaves - just the sort of thing that you can picture being served for breakfast at a French bakery with a steaming bowl of café au lait.
As a matter of fact, the idea for the recipe apparently came from a French bakery called Maison Landemaine. It is exquisite in the way French baked goods are often exquisite - not too sweet and not too rich.
I am literally eating a slice as I write this. My wife just said, "it is chocolate for adults."
On a few occasions, I have made an extraordinary bread called, ironically, pain ordinaire (pain is French for "bread"). Although this type takes the shortest amount of time to make - you can enjoy it the same day you started it - it has a brawny flavor.
And yet, it is made with a minimum of ingredients: flour, yeast, water and salt. What makes this country bread different, and so great, is the technique.
Other doughs rise until they are twice their original volume. This one actually triples in volume, which means it requires a flour with a significant amount of protein so it can withstand the expansion without collapsing. Bread flour is best, or that expensive, fancy-pants flour that is made from hard winter wheat.
Either way, it makes a bread that is anything but ordinary.
I next made a couple of exceptional loaves of honfleur country bread, a wonderfully rustic bread noted for its nutty flavor enlivened with just a hint of sweetness.
The sweetness comes from honey, which is primarily used to feed the yeast, but has the salutary secondary effect of making the bread taste just a little honeyed. And the nuttiness comes from the whole-wheat flour, which is mixed in more or less equal amounts with all-purpose flour or bread flour.
It is a thoroughly enjoyable, substantial bread that goes with just about everything and can be served in just about any circumstance.
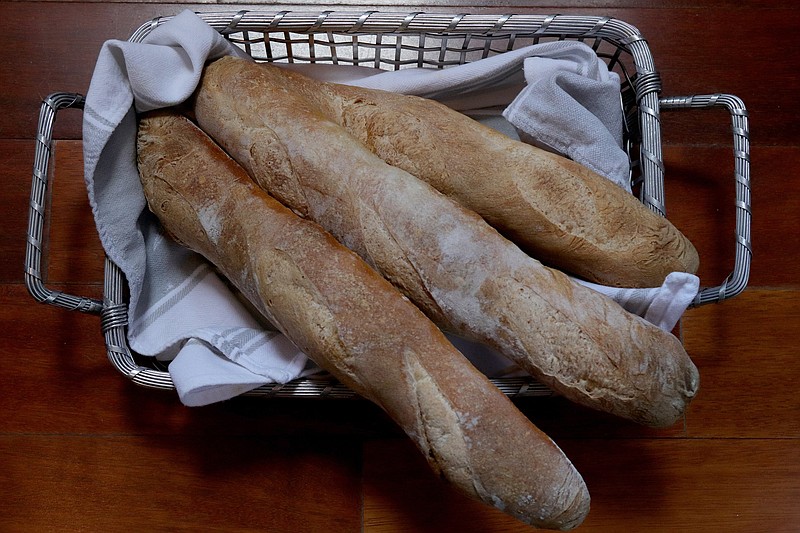
Which brings us to the baguettes. For my last bread, I made baguettes.
I had made baguettes before. They weren't bad, but, to be honest, they kind of tasted like long cylinders of ordinary bread.
But I decided to make these after running across a recipe for baguettes and a video showing techniques for making them that seemed special. The results looked like real baguettes.
But this is not a recipe (or techniques) for the faint of heart, and especially not for a novice baker. It takes something like 28 hours, though you could sleep through nearly all of the first 24.
And the result of all of this time and effort? Baguettes. Real, genuine, honest-to-God baguettes.
It's not just that the outside is crusty and the inside has a tender crumb. They actually taste like real baguettes, the kind you get from a French bakery. The kind you bring home from a boulangerie, with a bottle of inexpensive but fabulous red wine and a wedge of comté cheese, or perhaps brie.
These are baguettes, the way baguettes are supposed to be made. And they are certainly baguettes the way baguettes are supposed to be eaten.
The recipe makes three baguettes. Before the last one is finished, you'll want to get a start on making your next batch.
The recipes
NO-KNEAD BREAD
Yield: 12 servings
3 cups bread or all-purpose flour
1 1/4 teaspoons table salt
1/4 teaspoon yeast
1 1/3 cups cool water, 55-65 degrees
Wheat bran, cornmeal or additional flour for dusting
Note: For whole-wheat bread, use 2 1/4 cups all-purpose flour, 3/4 cup whole-wheat flour and 1/2 teaspoon yeast.
1. In a medium bowl, stir together the flour, salt and yeast. Add the water and, using a wooden spoon or your hand, mix until you have a wet, sticky dough, about 30 seconds. If it is not very sticky, add another tablespoon or two of water. Cover the bowl with a plate, tea towel or plastic wrap and let sit at room temperature until the surface is dotted with bubbles and the dough is more than doubled in size, from 12-18 hours.
2. When the first rise is complete, generously dust a work surface with flour. Use a bowl scraper or rubber spatula to scrape the dough out of the bowl in one piece. Using lightly floured hands or a bowl scraper or spatula, lift the edges of the dough in toward the center. Nudge and tuck in the edges of the dough to make it round.
3. Gently transfer the dough to a piece of parchment paper or a piece of aluminum foil sprayed with nonstick spray. If the dough is tacky, dust the top lightly with wheat bran, cornmeal or flour. Place in a bowl at least twice the size of the dough. Cover the dough lightly with a tea towel (not terry cloth) and place in a warm, draft-free spot to rise for 1-2 hours. The dough is ready when it is almost doubled. If you gently poke it with your finger, it should hold the impression. If it springs back, let it rise for 15 more minutes.
4. Half an hour before the end of the second rise, preheat the oven to 475 degrees, with a rack positioned in the lower third, and place a covered 4 1/2-5 1/2-quart heavy, ovenproof pot with a lid in the center of the rack.
5. Using pot holders, carefully remove the preheated pot from the oven and uncover it. Pick up the bread by the parchment paper and lower it and the parchment paper into the pot. Use caution - the pot will be very hot. Cover the pot and bake for 30 minutes.
6. Remove the lid and continue baking until the bread is a deep chestnut color, but not burned, 20-30 minutes more. Use a heatproof spatula or wooden spoon to carefully lift the bread out of the pot and place it on a rack to cool thoroughly.
Per serving: 124 calories; no fat; no saturated fat; no cholesterol; 4 g protein; 26 g carbohydrate; 1 g sugar; 1 g fiber; 243 mg sodium; 5 mg calcium
Recipe from "My Bread" by Jim Lahey (slightly revised)
CHOCOLATE BREAD
Yield: 36 servings (3 loaves)
2 1/4 teaspoons (1 packet) active dry yeast
2 1/4 cups lukewarm water
5 1/4 cups bread flour, plus more for dusting
1/2 cup unsweetened cocoa powder, preferably Dutch processed
2 tablespoons granulated sugar
2 teaspoons fine salt
5 ounces bittersweet chocolate chips (60% cacao) or chopped chocolate
Note: Prepare the dough the day before baking.
1. Sprinkle the yeast in 1 cup of the lukewarm water. Set aside 10 minutes until foamy on the surface.
2. In the bowl of a stand mixer fitted with a dough hook (or in a large bowl if working by hand) stir together the flour, cocoa powder, sugar, salt, yeast mixture and remaining 1 1/4 cups lukewarm water until combined. Knead with the dough hook on medium-low speed for 5 minutes (if working by hand, transfer to the counter and knead for 10 minutes), until the dough is smooth and pulls away from the sides of the bowl or counter.
3. Add the chocolate chips and knead just to distribute (if working by hand, return to the bowl). Cover the bowl with a kitchen towel and let rest for 1 hour at room temperature in a draft-free corner of the kitchen.
4. After this rest, "fold" the dough about 12 times in the bowl, pulling it up from the sides and over itself. Cover the bowl with plastic wrap and refrigerate for 8-12 hours.
5. The next day, remove the dough from the fridge; it should have doubled in size. Remove the plastic wrap and cover the bowl with a kitchen towel. Let the dough come back to room temperature, about 1 hour.
6. Line a baking sheet with parchment paper. Scrape the dough onto a well-floured surface and divide into three equal pieces. To shape, first flatten each into a round about 8 inches in diameter. If the dough is stiff, use your fist to pound it into submission. Now, imagine the round as a clock face; Picking up the dough from 10 and 2, pull both edges in and overlap in the center to form a narrow triangle, pointy end at the top. Switch the dough around so the pointy end points toward you, and roll up the triangle gently but firmly, starting from the pointy end, tucking the free sides in until you reach the end.
7. Transfer to the prepared baking sheet, spacing the loaves a few inches apart. Let rest 30 minutes. Meanwhile, preheat oven to 450 degrees.
8. Spray a sharp knife with nonstick spray and, holding the blade at an angle, slash the top of each loaf three times. Bake in the middle of the oven until the loaves sound hollow when tapped on the bottom, 40-45 minutes, rotating the sheet from front to back after 30 minutes.
9. Cool on a rack completely before eating (the bread will be gummy if you slice it too soon).
Per serving: 98 calories; 2 g fat; 1 g saturated fat; no cholesterol; 3 g protein; 19 g carbohydrate; 3 g sugar; 1 g fiber; 131 mg sodium; 5 mg calcium
Recipe from "Tasting Paris" by Clotilde Dusoulier
PAIN ORDINAIRE
Yield: 2 loaves, 24 servings
6 cups bread or all-purpose flour, approximately
2 packages (1 1/2 tablespoons) active dry yeast
21/2 cups hot water (120-130 degrees)
2 teaspoons salt
2 teaspoons water
1. Measure 3-4 cups of flour into a stand mixer's bowl and add the yeast and hot water. Mix for 10 minutes; the dough will be smooth and pull away from the sides. If the dough rides up the beater, push it down with a rubber spatula. When nearly finished, dissolve the salt in the water as well as you can and add to the batter. Blend for 30 seconds or more.
2. Add additional flour to the beaten batter, 1/2 cup at a time, stirring first with a large spoon and then working by hand. When the dough is shaggy but a solid mass, turn onto a work surface and begin kneading aggressively for 10 minutes. If the dough is sticky, sprinkle with additional flour. Break the kneading rhythm occasionally by throwing the dough down hard against the counter.
3. Place the dough in a large greased bowl, cover with plastic wrap, and leave at room temperature for 2 hours. The dough will more than triple in volume and may push against the plastic covering.
4. Turn the dough onto the work surface and knead for about 3 minutes. Return the dough to the bowl and cover with waxed paper. Allow to rise to more than triple its volume, about 1 1/2 hours.
5. Turn the dough onto a floured work surface and punch it down. Divide into 2 pieces, and allow them to rest 5 minutes. Grease a baking sheet, line with parchment paper or sprinkle with cornmeal. Shape each piece of dough into a tight ball and place on the prepared baking sheet. Cover with a cloth and allow to rise at room temperature until more than double their size, about 1 hour.
6. While the loaves are rising, place a broiler pan or cast-iron pan on floor of oven or bottom rack. Preheat to 450 degrees. Five minutes before baking, pour 1 cup hot water into pan - be careful of the burst of steam, which can burn you.
7. With a razor blade, lame or sharp knife sprayed with nonstick spray, cut a hash mark in the top of each loaf about 1/2-inch deep. Bake on middle shelf of oven until golden brown, 25-30 minutes. The loaves are done when they sound hollow if you tap them on the bottom. Place on a rack to cool.
Per serving: 115 calories; no fat; no saturated fat; no cholesterol; 4 g protein; 24 g carbohydrate; 1 g sugar; 1 g fiber; 195 mg sodium; 5 mg calcium
Recipe from "Bernard Clayton's New Complete Book of Breads" by Bernard Clayton Jr.
HONFLEUR COUNTRY BREAD
Yield: 2 large loaves, about 24 servings
For the starter
1 tablespoon honey
2 1/4 teaspoons (one packet) active dry yeast
1 cup hot water (120-130 degrees)
1 cup bread or all-purpose flour, approximately
1 cup whole-wheat flour
For the dough
2 cups hot water (120-130 degrees)
1 tablespoon salt
2 cups whole-wheat flour
2-3 cups bread or all-purpose flour, approximately
1. To make the starter, dissolve the honey in 1 cup of hot water in a large bowl and add the yeast. Add 1/2 cup each white and whole-wheat flour to make a thick batter. Add the remaining 1/2 cup of each flour to make a shaggy mass that can be worked with your hands. Knead for 3 minutes. Toss in liberal amounts of flour if the dough is slack or sticky. Cover the bowl with plastic wrap and leave at room temperature at least 4 hours or overnight.
2. To make the dough, pour 2 cups of hot water over the starter and stir with a large wooden spoon to break up the dough. Add the salt. Place 2 cups each of whole-wheat and white flour at the side of the mixing bowl and add equal parts of each 1/2 cup at a time, first stirring with a spoon and then working it with your hands. It may take more white flour to make a mass that is not sticky.
3. Knead the dough aggressively on a floured work surface for 10 minutes, adding sprinkles of flour if the dough is slack and sticky. Three or four times while kneading, lift the dough high above the work surface and slam it down.
4. Place the ball of dough in a large greased bowl, cover with plastic wrap and leave at room temperature until doubled in volume, anywhere from 1 1/2-3 hours.
5. Lightly grease two baking sheets, line with parchment paper or coat in cornmeal. Push down the dough and turn out onto a well-floured work surface. Divide into two pieces. Use cupped hands to shape them into tight balls. Place the balls on the prepared baking sheets and press down to flatten slightly. Cover with waxed paper and leave at room temperature until tripled in size, about 2-2 1/2 hours.
6. About 20 minutes before baking, preheat the oven to 425 degrees and place a broiler pan or cast-iron pan on the bottom rack. Five minutes before the bread goes in the oven, pour 1 cup hot water into the pan to create a moist, steamy oven (be careful; the steam can burn you).
7. Bake the loaves in the bottom and top thirds of the oven until golden brown and sound hollow when tapped on the bottom, 40-50 minutes. Halfway through baking, switch the oven position of the loaves. Cool on a rack before serving.
Per serving: 112 calories; no fat; no saturated fat; no cholesterol; 4 g protein; 24 g carbohydrate; 1 g sugar; 2 g fiber; 293 mg sodium; 9 mg calcium
Recipe from "Bernard Clayton's New Complete Book of Breads" by Bernard Clayton Jr.
24-HOUR BAGUETTES
Yield: 3 baguettes, 12 servings
2 1/4 cups (275 grams) all-purpose flour
2 1/4 cups (275 grams) bread flour
2 1/2 teaspoons (14 grams) salt
1/3 teaspoon (heaping 1/4 teaspoon, 1 gram) active dry yeast
1 1/2 cups (360 grams) water, at room temperature
Note: From start to finish, this recipe takes 28 hours or more.
1. Combine flours, salt and yeast in mixing bowl and whisk together. Add water and mix until combined roughly. Dump contents onto table or cutting board and knead for 2-3 minutes until well mixed.
2. Place dough ball in a large greased bowl or container, cover with lid or plastic wrap and leave at room temperature for 12 hours. Then place in the refrigerator for 12 more hours.
3. Divide the risen dough into three equal portions. On a well-floured surface, take one of the portions and, holding down the part closest to you, stretch the rest away from you and then fold it back on top of itself. Turn the dough 180 degrees so that the part that faced away from you is now closest to you. Again, hold down the part that is closest to you, stretch the rest away from you, and then fold it back down on top of itself. Rotate the dough 90 degrees so that one of the parts that was on the side is now toward you, stretch the rest away from you and fold it back on top of itself. Rotate the dough 180 degrees, stretch the dough away from you and then fold it back on top of itself. Repeat the process with the remaining two portions of dough.
4. Lightly cover the dough portions with plastic wrap and allow to rest 30 minutes. Repeat the process of stretching and folding three more times, resting 30 minutes after each. The last time, pinch together each seam, and rest 30 minutes, covered with plastic wrap.
5. Gently pat down one of the portions until it forms a rectangle about 6 inches by 4 inches. Fold the top third of the dough lengthwise over the next third, and gently seal with the heel of your hand. Rotate the dough 180 degrees and again fold the top third of the dough lengthwise over and gently seal the seam with your fingertips. Fold the top half (lengthwise) over the bottom half and press down with the heal of your hand; you will hear air bubbles popping. Pinch together the seam and roll out the dough until it is about 14 inches long - be sure not to make it longer than your pizza stone or baking sheet. If the dough keeps springing back to a shorter length, allow it to rest for a few minutes and then roll it again until it is longer. Repeat the process for the other two portions of dough.
6. Place the baguettes in a linen towel or something similar that has been folded to have three valleys. The cloth will help the baguettes keep their long, narrow shape while they rise one last time. Cover lightly with plastic wrap and allow to rest 1 1/2 hours. Immediately begin the next step.
7. As soon as you are done shaping the baguettes and just as they are beginning to rest, place a cast-iron pan on the bottom rack of your oven and place a baking stone or an upside-down baking sheet on the rack above the top of the pan. If you have another baking stone, place it on the oven's top rack; otherwise, don't worry about it. Immediately preheat the oven to 500 degrees; the long preheating time will bring the baking stone or baking sheet to the proper temperature.
8. Place a sheet of parchment paper on a pizza peel or the back of a baking sheet and gently roll the baguettes onto the parchment. Make sure they are a few inches apart, and if there is a seam, take care to place it on the bottom of the baguette. With a lame, razor blade or sharp knife sprayed with nonstick spray, cut 3 long slashes about 1/2-inch deep in each baguette; the slashes should be lengthwise but each should also run diagonally from one side of the baguette top to the other.
9. Have about 1 1/2-2 cups of ice ready. Open the oven and carefully slide the parchment paper and baguettes onto the hot baking stone or baking sheet on the lower rack. Pull the rack with the hot pan partly out of the oven, quickly toss in the ice and very quickly close the oven door. Bake without opening the door for 15 minutes (use the oven light and window if you need to take a peek). Briefly open the door to allow some steam to escape, close it again and bake 5-10 more minutes until golden brown. Cool on a rack.
Per serving: 166 calories; 1 g fat; no saturated fat; no cholesterol; 5 g protein; 34 g carbohydrate; 1 g sugar; 1 g fiber; 454 mg sodium; 8 mg calcium
Adapted from recipes by bakingsteel.com and joyofbaking.com